
Step 1 — Install Nginx
Install the EPEL repository for additional packages like Nginx:
yum install epel-releaseNow install Nginx:
yum install nginxStart Nginx:
systemctl start nginxSet Nginx to start on boot:
systemctl enable nginxStep 2 — Install PHP
2-1. Install PHP
Install extra package to Centos
sudo yum -y install https://dl.fedoraproject.org/pub/epel/epel-release-latest-7.noarch.rpm
sudo yum -y install https://rpms.remirepo.net/enterprise/remi-release-7.rpm
sudo yum -y install yum-utils
Install package to manage yum repositories
sudo yum-config-manager --disable 'remi-php*'Enable PHP 8.1 stream
sudo yum-config-manager --enable remi-php81Check if PHP8.1 is enabled from repo list
sudo yum repolistIf yes, then continue the installation process
sudo yum -y install php php-{cli,fpm,mysqlnd,zip,devel,gd,mbstring,curl,xml,pear,bcmath,json,opcache,redis,memcache}2-2. Configure the PHP Processor
Edit the php-fpm config www.conf:
nano /etc/php-fpm.d/www.confFind the the listen parameter line, and change it so it looks like this:
listen = /var/run/php-fpm/php-fpm.sock Next, find the lines “listen.owner and listen.group” and uncomment them. They should look like this:
listen.mode = 0666
listen.owner = nginx
listen.group = nginx
Lastly, find the lines that set the user and group and change their values from “apache” to “nginx”:
user = nginx
group = nginx
Then save and quit. Now, we just need to start our PHP processor by typing:
systemctl start php-fpmNext, set php-fpm to start on boot:
systemctl enable php-fpmAllow php session (cookie, e.g. PHPMYADMIN)
sudo chmod 777 -R /var/lib/php/sessionStep 3 — Install MYSQL
Find Red Hat Enterprise Linux 7 / Oracle Linux 7 (Architecture Independent), RPM Package
https://dev.mysql.com/downloads/repo/yum
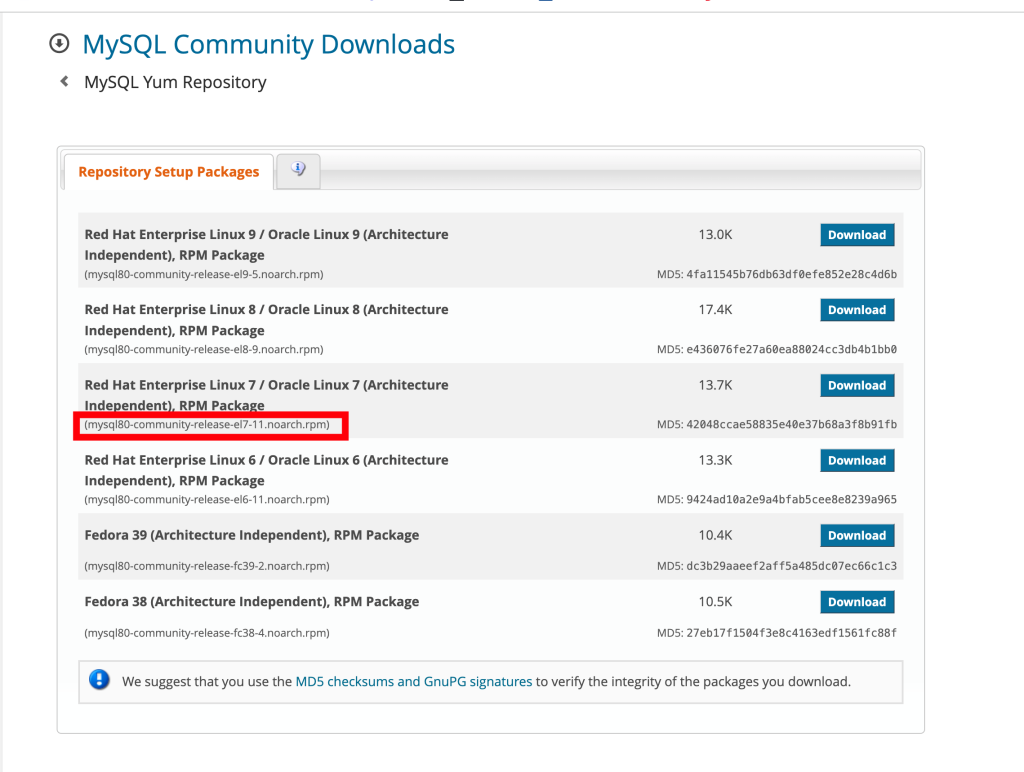
Update it as needed in the link below:
Replace the XXXX with the version name, for example, mysql80-community-release-el7-11.noarch.rpm shown above.
e.g. curl -sSLO https://dev.mysql.com/get/mysql80-community-release-el7-11.noarch.rpm
curl -sSLO https://dev.mysql.com/get/XXXXXXXInstall the package
Replace the XXXX with the version name, for example, mysql80-community-release-el7-11.noarch.rpm shown above.
e.g. sudo rpm -ivh mysql80-community-release-el7-11.noarch.rpm
sudo rpm -ivh XXXXXX
sudo yum install mysql-server
Start the package
sudo systemctl start mysqld
sudo systemctl enable mysqld
Get password
sudo grep 'temporary password' /var/log/mysqld.logAnd login with password and configure with the step displayed
sudo mysql_secure_installationStep 4 – install vsftpd
4-1. Install vftpd
Install VSFTPD software with the following command:
sudo yum install vsftpdStart the service and set it to launch when the system boots with the following:
sudo systemctl start vsftpd
sudo systemctl enable vsftpd
4-2. Configuring vftpd
Edit the configuration file with the following command:
sudo nano /etc/vsftpd/vsftpd.confFind the following entries in the configuration file, and edit them to match the following:
Set your FTP server to disable anonymous users and allow local users.
anonymous_enable=NO
local_enable=YES
write_enable=YES
chroot_local_user=YES
allow_writeable_chroot=YES
userlist_enable=YES
userlist_file=/etc/vsftpd/user_list
userlist_deny=NO
allow passive ftp
pasv_enable=Yes
pasv_max_port=10100
pasv_min_port=10090
Make sure you have opened the following ports for FTP connection:
20-21/TCP, 10090-10100/TCP
Restart ftp service
sudo systemctl restart vsftpd4-3. Create a New FTP User
To create a new FTP user enter the following:
sudo passwd testuser
sudo adduser testuser
Add the new user to the userlist:
echo “testuser” | sudo tee –a /etc/vsftpd/user_listAdd to the same group of nginx (add both root and sys_admin)
sudo usermod -a -G nginx sys_admin
sudo usermod -a -G nginx root
Create a home folder (skip if exists)
cd /home/sys_admin
mkdir html
mkdir conf.d
Change conf.d file to /home
nano /etc/nginx/nginx.confModify the following line
#include /etc/nginx/conf.d/*.conf;   <— comment this
include /home/sys_admin/conf.d/*.conf;   <— add this
Adjust permissions:
cd /home/sys_admin/
sudo chmod 777 html
sudo chmod 777 conf.d
sudo chown –R nginx:nginx /home/sys_admin/html
sudo chown –R nginx:nginx /home/sys_admin/conf.d
Done
You can place the site files in html folder

You can create .conf file in conf.d folder to set up a site, use the following format
server {
    server_name site.com; #change this to your url
    root "/home/sys_admin/html/peterliu.top"; #change this to your site file

    index index.php index.html index.htm;
    charset UTF-8;

    location / {
        try_files $uri $uri/ /index.php?$args; #add this for wordpress
    }

    error_page 404 /404.html;
    error_page 500 502 503 504 /50x.html;


    location = /50x.html {
        root /usr/share/nginx/html;
    }


    location ~ \.php$ {
        try_files $uri =404;
        fastcgi_pass unix:/var/run/php-fpm/php-fpm.sock;
        fastcgi_index index.php;
        fastcgi_param SCRIPT_FILENAME $document_root$fastcgi_script_name;
        include fastcgi_params;
    }
}
You can generate Let’s Encrypt SSL using certbot
Install snap
https://snapcraft.io/docs/installing-snap-on-centos
Install Certbot (If you just installed snap, make sure you wait for 5 mins or reboot it before this step )
sudo snap install --classic certbot
Prepare the Certbot command
sudo ln -s /snap/bin/certbot /usr/bin/certbot
Run command
sudo certbot --nginxCredit:
- https://wiki.crowncloud.net/?guide_for_nginx_php_on_centos_7#Step+1+%E2%80%94+Install+Nginx
- https://www.inmotionhosting.com/support/product-guides/vps-hosting/how-to-create-a-new-user-in-centos-7
- https://phoenixnap.com/kb/how-to-setup-ftp-server-install-vsftpd-centos-7
- https://certbot.eff.org/instructions?ws=nginx&os=centosrhel7
- https://snapcraft.io/docs/installing-snapd
- https://www.google.com/url?sa=i&url=https%3A%2F%2Fwww.hostinger.com%2Ftutorials%2Fwhat-is-centos&psig=AOvVaw16J_6LWz0sRXb6L66ip76l&ust=1712656830661000&source=images&cd=vfe&opi=89978449&ved=0CBQQjhxqFwoTCOCxxYKusoUDFQAAAAAdAAAAABAJ