
If you are finding setup site to site VPN with dynamic dns please move to 1-1.
How to setup free DDNS access in Fortigate?
Create site to site VPN (HQ NODE1)
1-1 Setup phase 1 and phase2
1-2 Setup address object
1-3 Setup policies.
1-4 Setup routes.
Create site to site VPN (Branch NODE2)
1-1 Setup phase 1 and phase2
1-2 Setup address object
1-3 Setup policies.
1-4 Setup routes.
Connect S2S VPN and Ping
In this practice, I am connecting node2 and node1 able to access each other. First, let review how site to site VPN work.
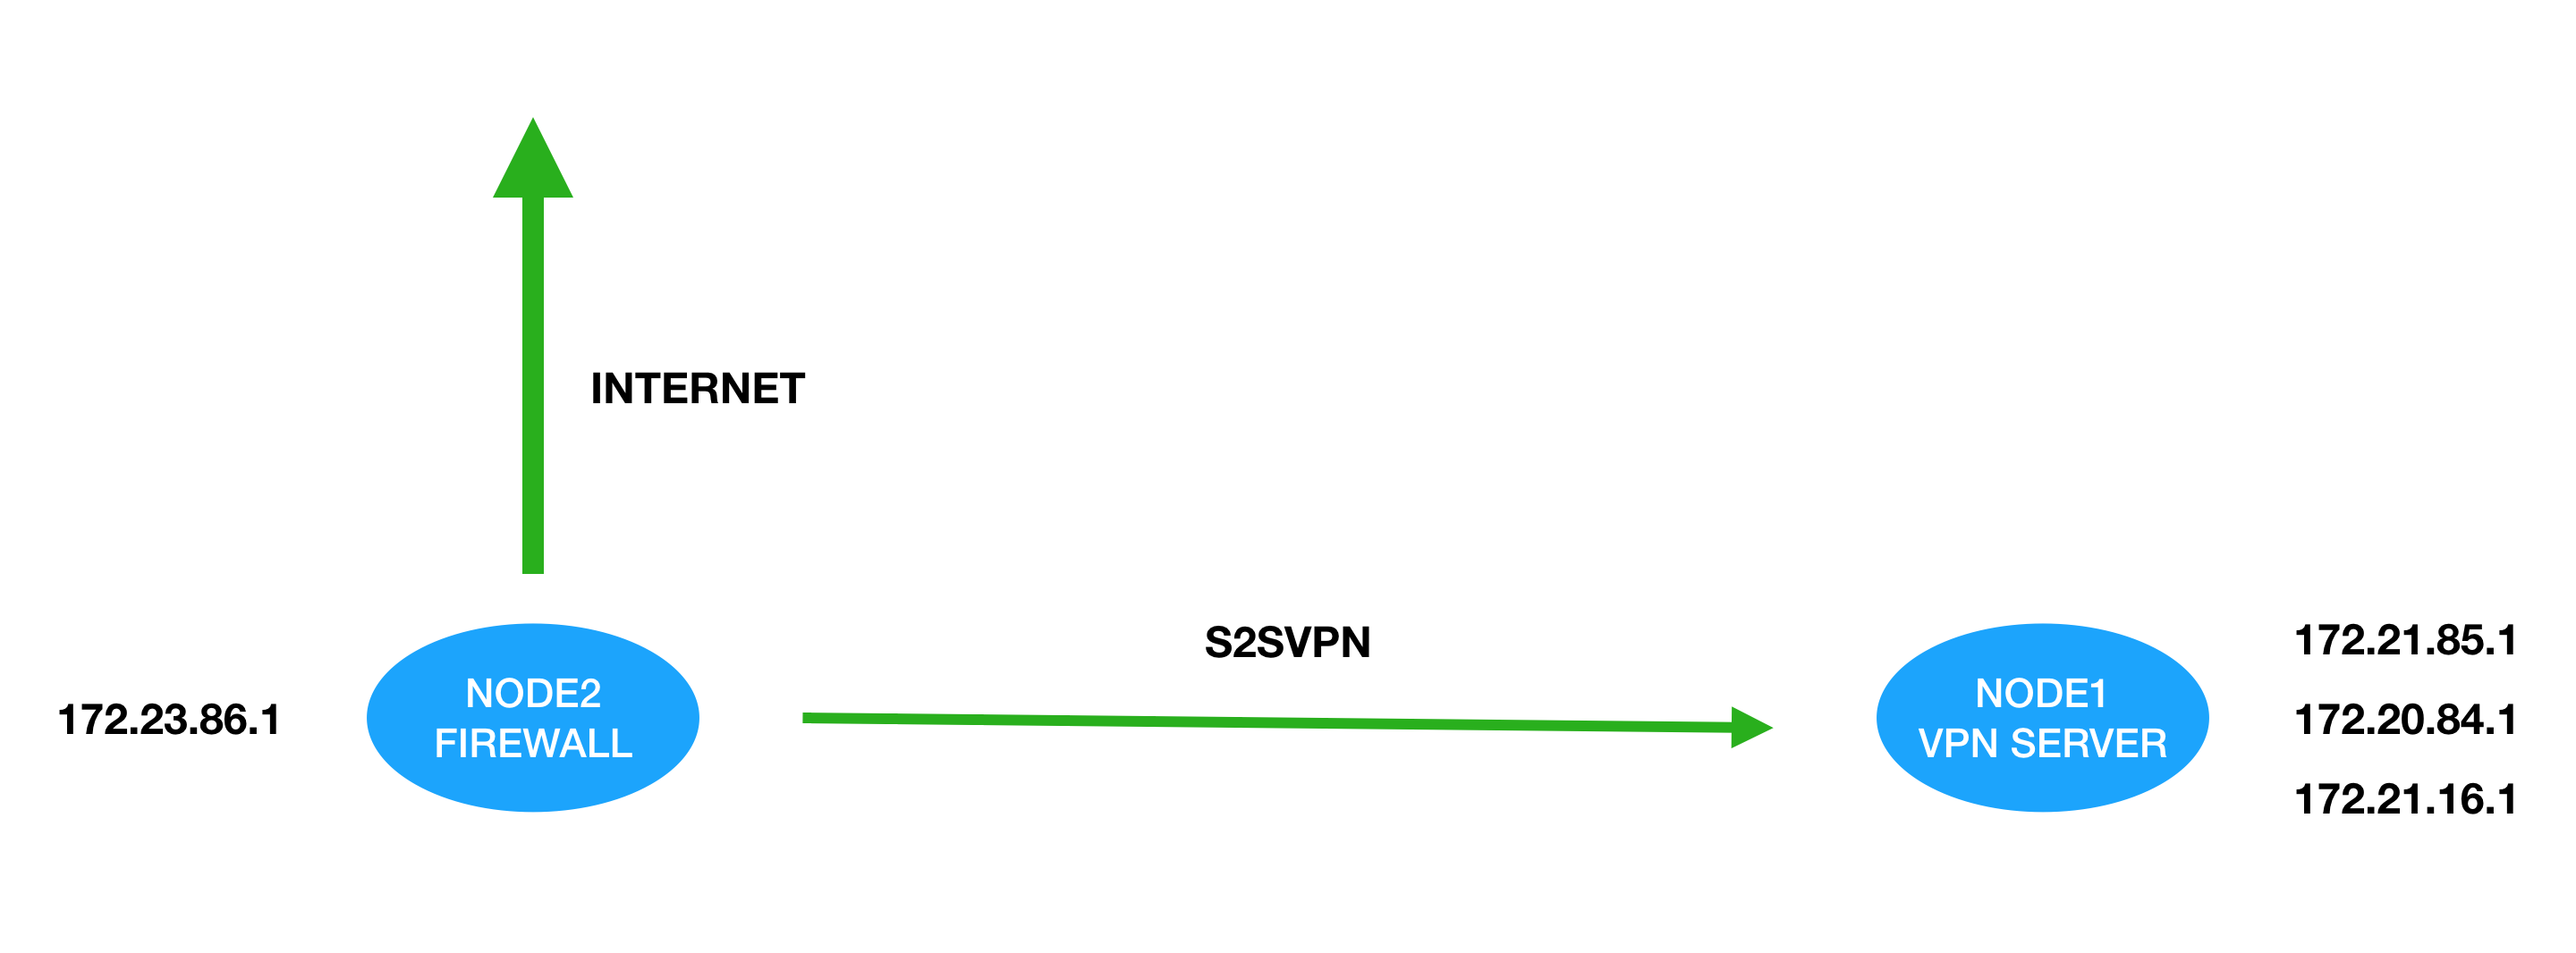
Site to site VPN different than IPSEC VPN. IPSEC send all of traffic to the server and process in remote gateway. Site to site VPN use policy and route to identify where should traffics go. For example, from the above images, when node2 detect internal try to connect on 172.20.84.0/24 it will automatic send this session to S2S VPN. After node1 get this traffic, it follow the policy in node1 to process this session.
Create site to site VPN (HQ and Branch)
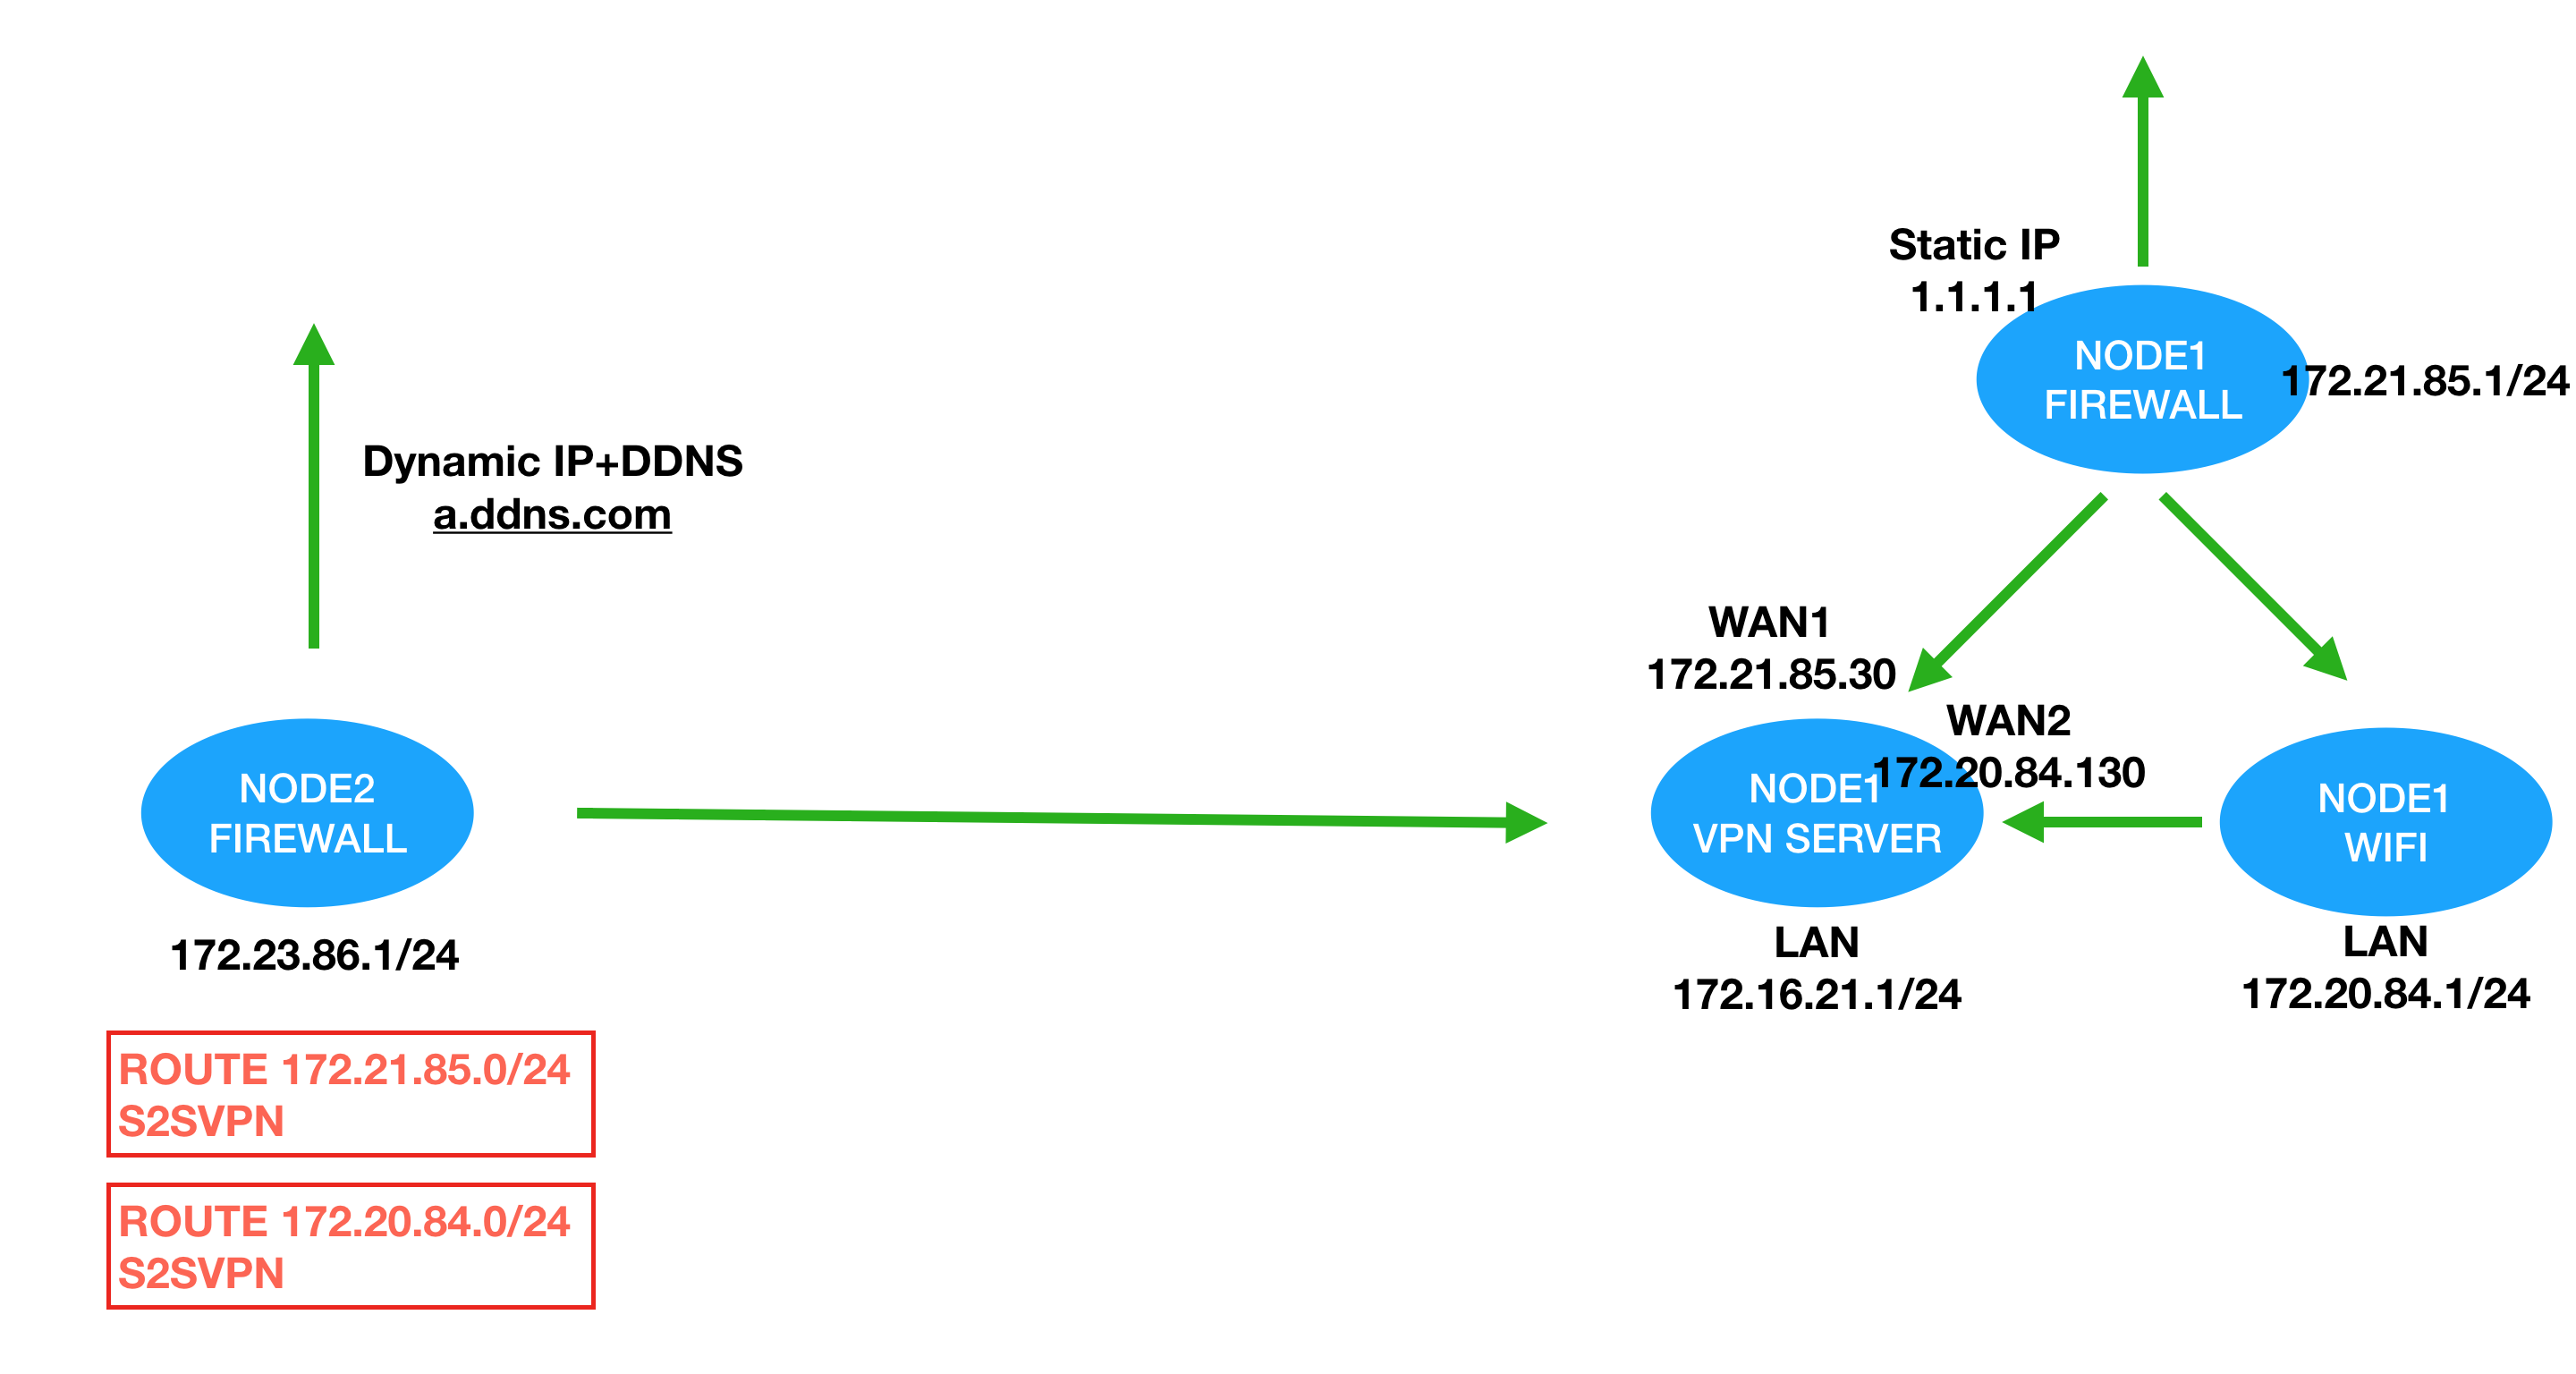
In this tutorial, you should setup both local office(HQ) and remote office(Branch). This is the network map of my tutorial.
Make sure you backup everything before you start.
NODE1 LOCAL OFFICE HQ
1-1 Setup Phase1 and Phase2
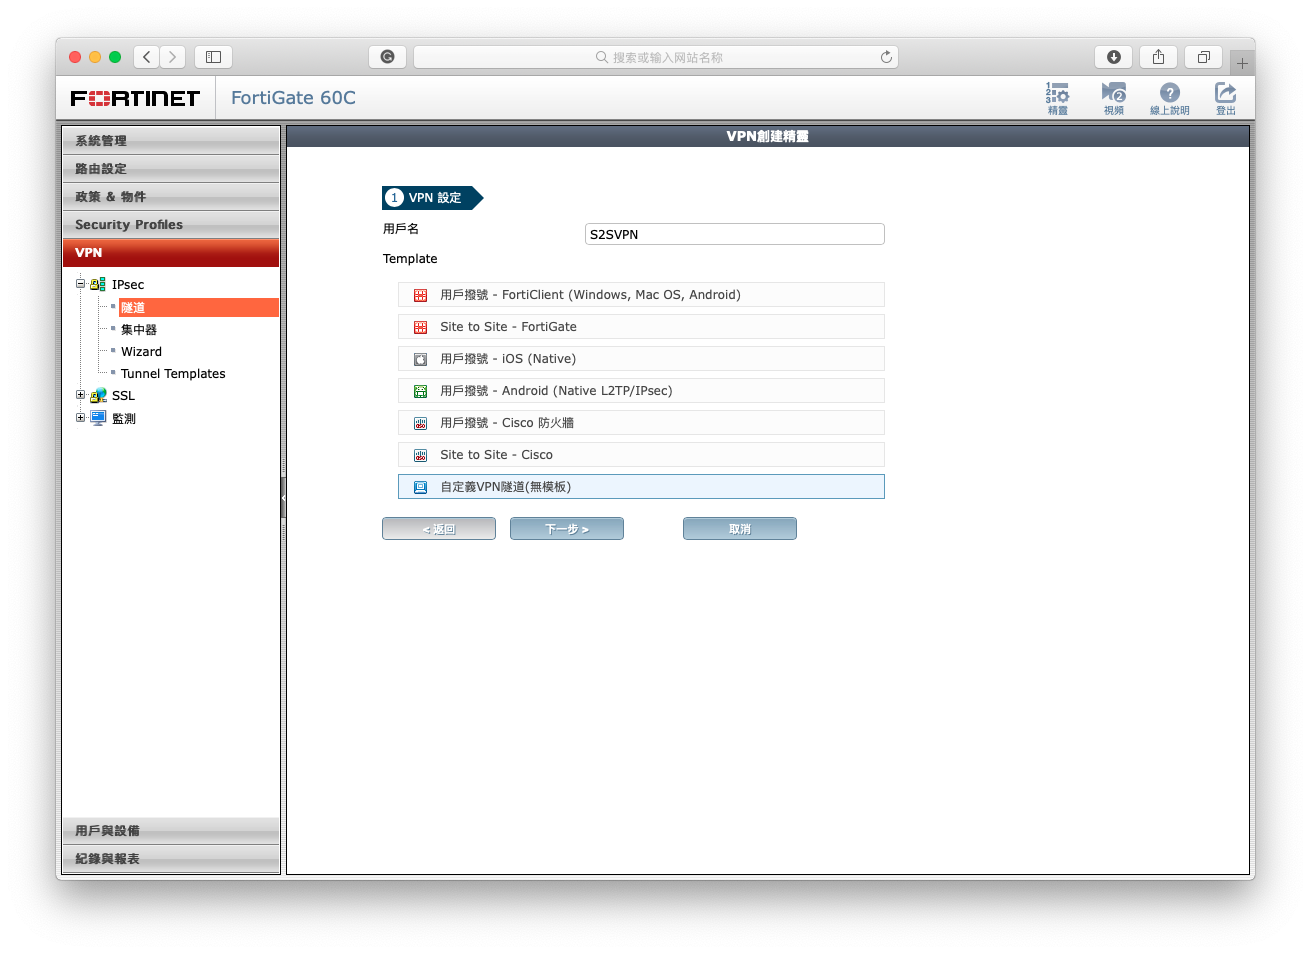
Go to VPN > Create (Left Top). (Notes: If there is no VPN option in you panel, turn it on in System Administration > Setting > Feature > VPN)
- Create a VPN phase without using template and give it a unique name.
- Setup Phase1 first. (Note: You just need to setup the label I highlight)
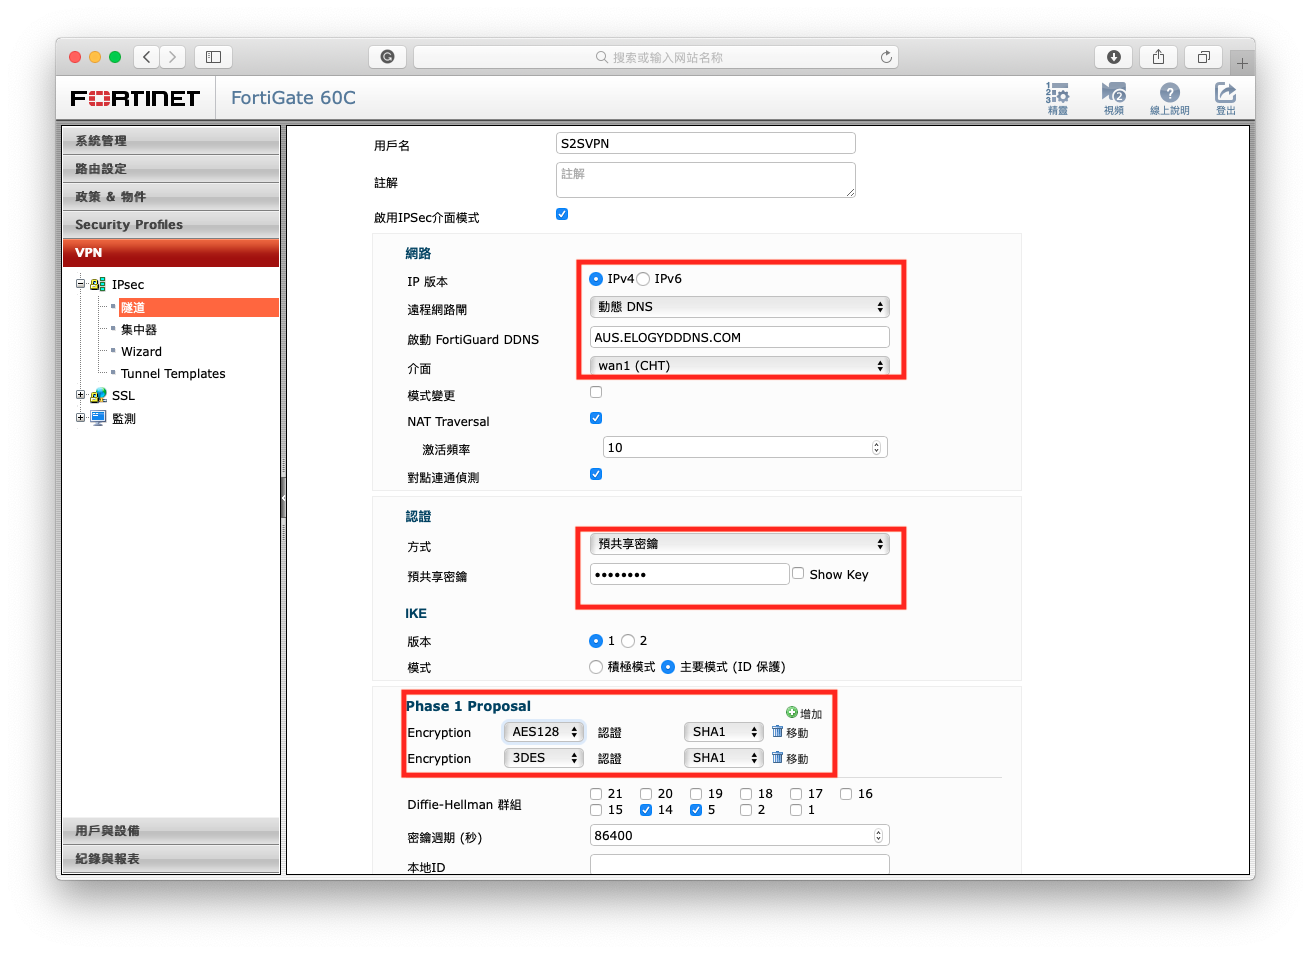 Remote Gateway: You are able to choose dynamic dns if you don’t have static in the other node, but you should understand at least one node using static IP is more stable that DDNS. Enter the other node IP or DDNS. Choose an interface for internet outgoing. How to setup free DDNS access in Fortigate?
Verify: Same as IPSEC/L2TP VPN setup a shared-key. Don’t forget to enter the same one in Branch node.
Phase 1 Proposal: Just set AES128 => SHA1 and 3DES=> SHA1 (Notes: It is note able to choose SHA1 when you select 3DES, but it set 3DES=> SHA1 and extra encryption with default. So remove the extra encryption.)
- Setup Phase2 second. (Note: You just need to setup the label I highlight)
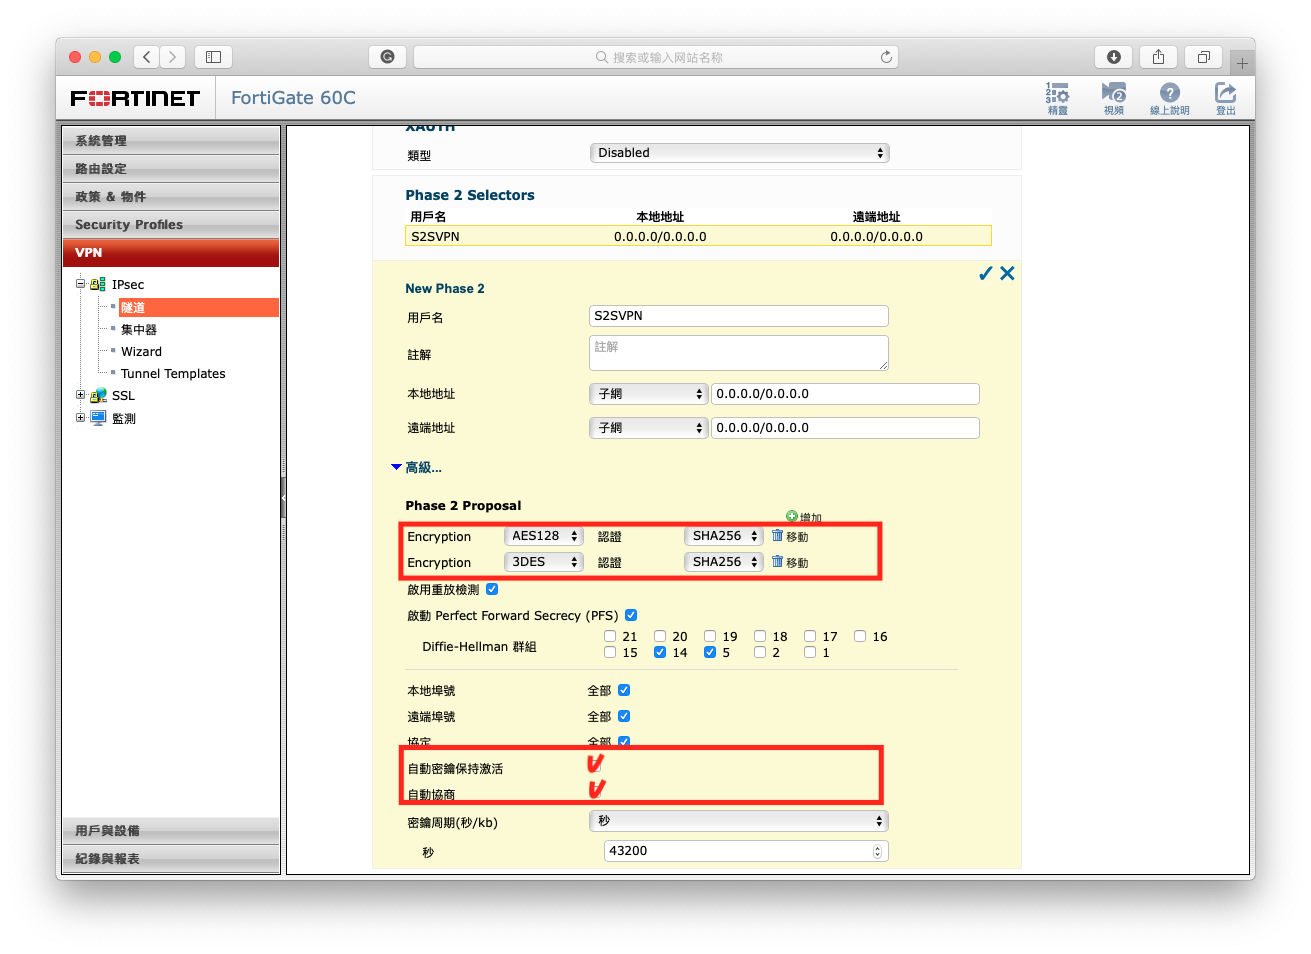
Phase 2 Proposal: Just set AES128 => SHA1 and 3DES=> SHA1 (Notes: It is note able to choose SHA1 when you select 3DES, but it set 3DES=> SHA1 and extra encryption with default. So remove the extra encryption.)Select Autokey Keep Alive and Auto-negotiate: For prevent VPN disconnect when there is no traffic
Note: You don’t need to set local address and remote address now, set this option in policy is easy for use to change setting or block illegal session form branch office.
After this click finish to save changes and create VPN phase1 and two
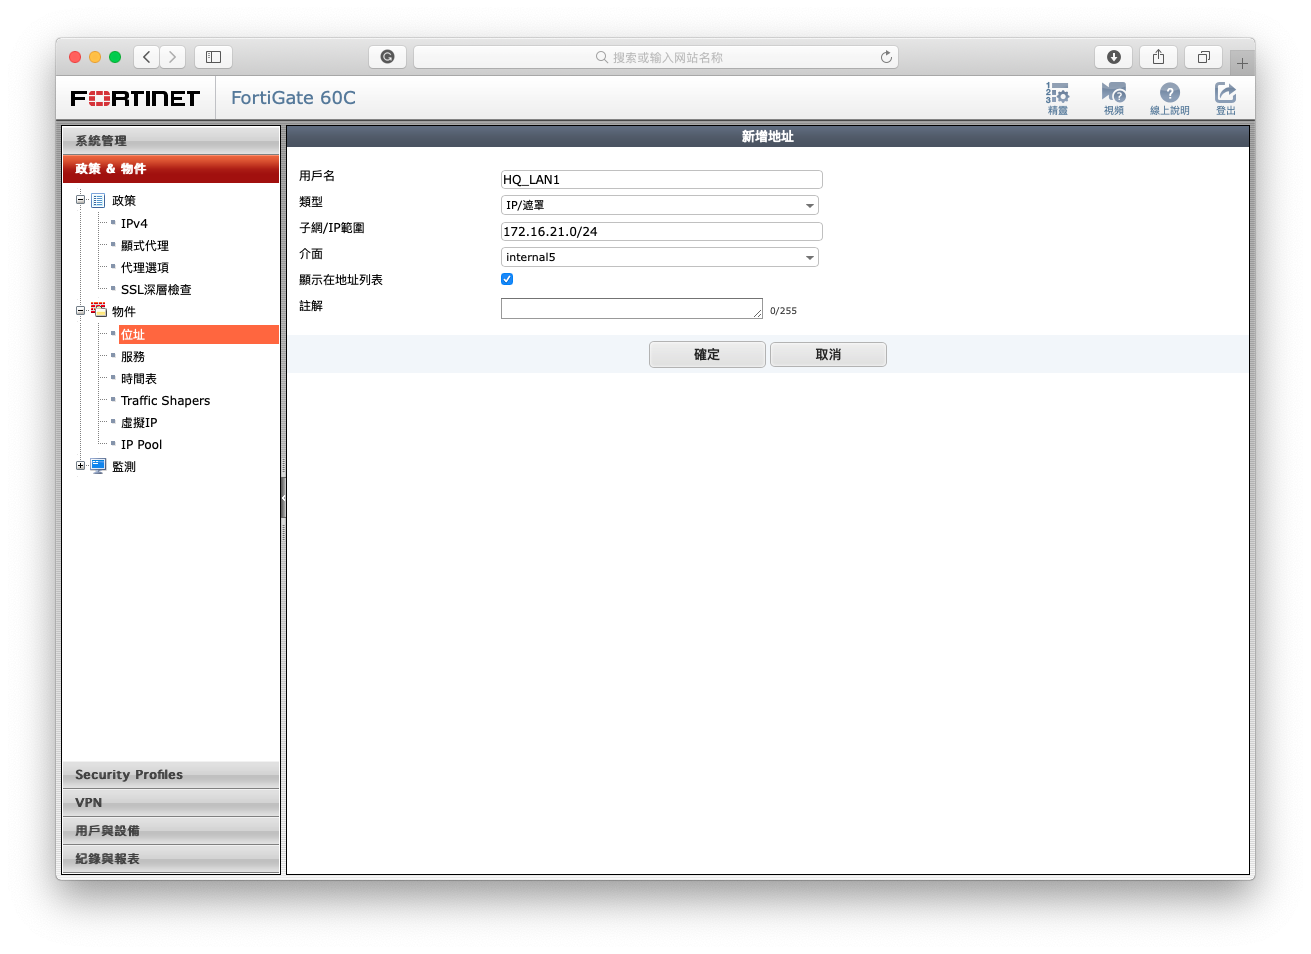
1-2 Setup address object
Go to Policy and Object > Address > Add New in Fortigate panel.
- Create a new address of LOCAL SUBNET (Internal Interface).
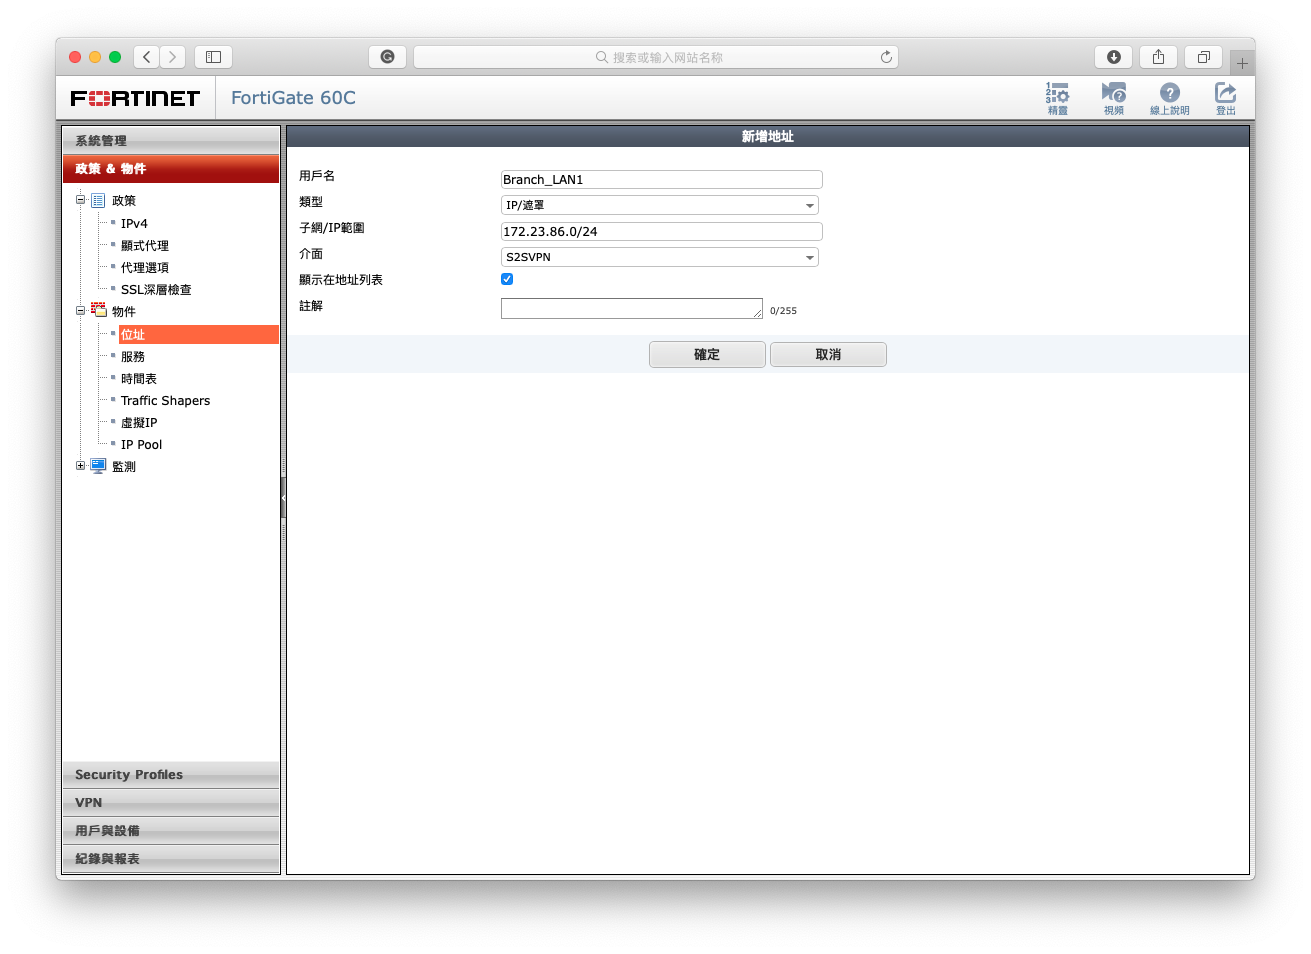
- Create a new address of REMOTE SUBNET (S2SVPN Interface).
1-3 Setup policies.
Go to Policy and Object > IPv4 in Fortigate panel.
This policies allow we to access Node2 and allow Node 2 to access Node 1.
- From S2SVPN “Branch_LAN1” to Internal “HQ_LAN1” : remote to access Node1.(without NAT)
From Internal “HQ_LAN1” to S2SVPN “Branch_LAN1” : local to access Node2.(without NAT)

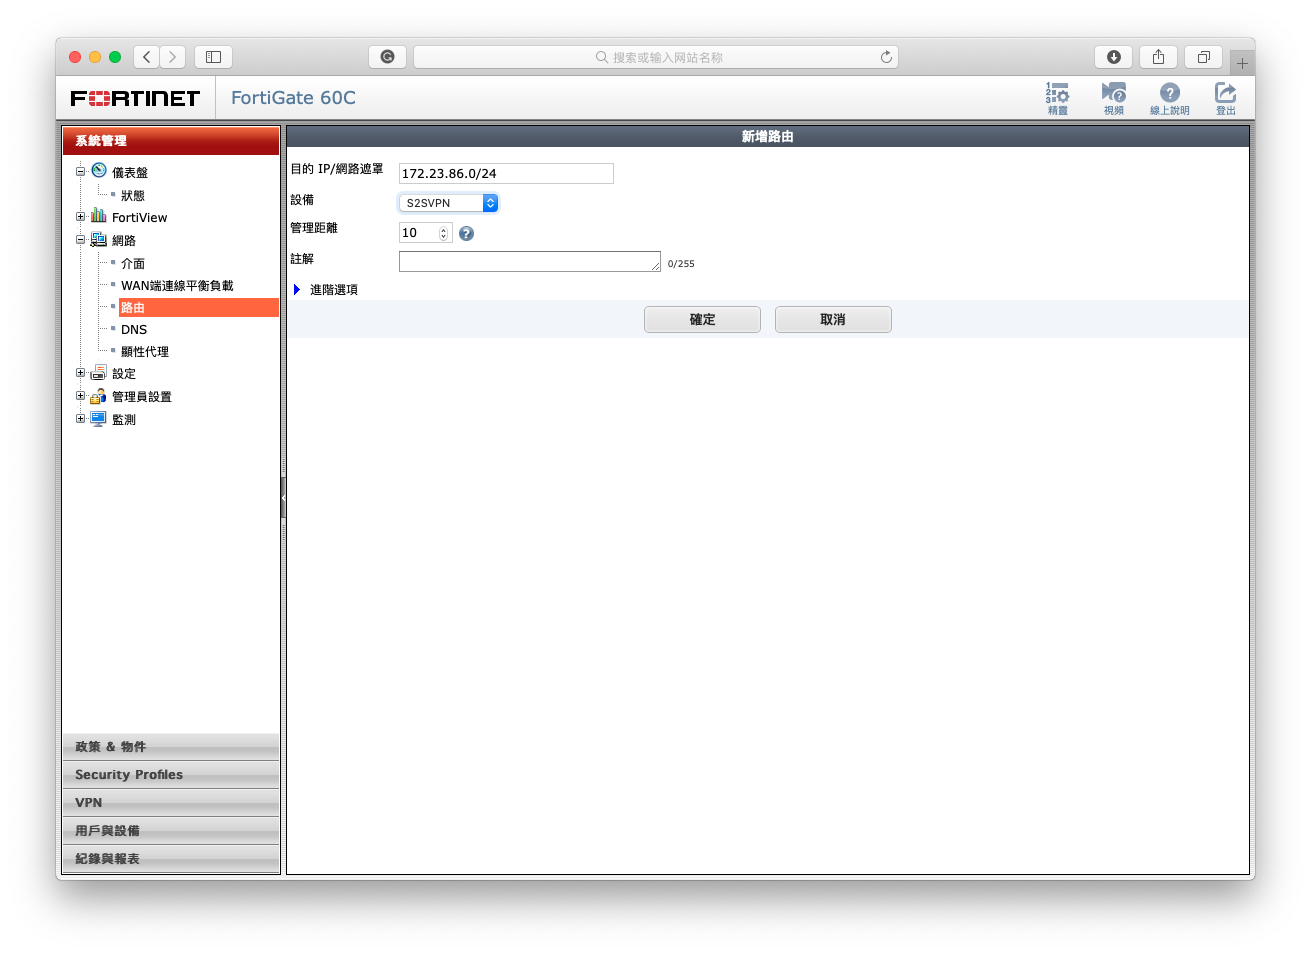
1-4 Setup routes.
Go to System Administration > Internet > Route in Fortigate panel.
- Set a route of 172.23.86.0/24 to interface S2SVPN. This help traffic of node2 to be send to node2.
NODE2 REMOTE OFFICE BRANCH
The step of setting up second node is similar with the first node, just a few changes.
1-1 Setup Phase1 and Phase2
Go to VPN > Create (Left Top). (Notes: If there is no VPN option in you panel, turn it on in System Administration > Setting > Feature > VPN)
- Create a VPN phase without using template and give it a unique name.
- Setup Phase1 first. (Note: You just need to setup the label I highlight)Remote Gateway: My node1 was using static IP, so I will choose static IP here. (If you are using DDNS than choose Dynamic DNS.)How to setup free DDNS access in Fortigate?
Verify: Same as IPSEC/L2TP VPN setup a shared-key. Don’t forget to enter the same one in Branch node.
Phase 1 Proposal: Just set AES128 => SHA1 and 3DES=> SHA1 (Notes: It is note able to choose SHA1 when you select 3DES, but it set 3DES=> SHA1 and extra encryption with default. So remove the extra encryption.)
- Setup Phase2 second. (Note: You just need to setup the label I highlight)
Phase 2 Proposal: Just set AES128 => SHA1 and 3DES=> SHA1 (Notes: It is note able to choose SHA1 when you select 3DES, but it set 3DES=> SHA1 and extra encryption with default. So remove the extra encryption.)Select Autokey Keep Alive and Auto-negotiate: For prevent VPN disconnect when there is no traffic
Note: You don’t need to set local address and remote address now, set this option in policy is easy for use to change setting or block illegal session form branch office.
After this click finish to save changes and create VPN phase1 and two
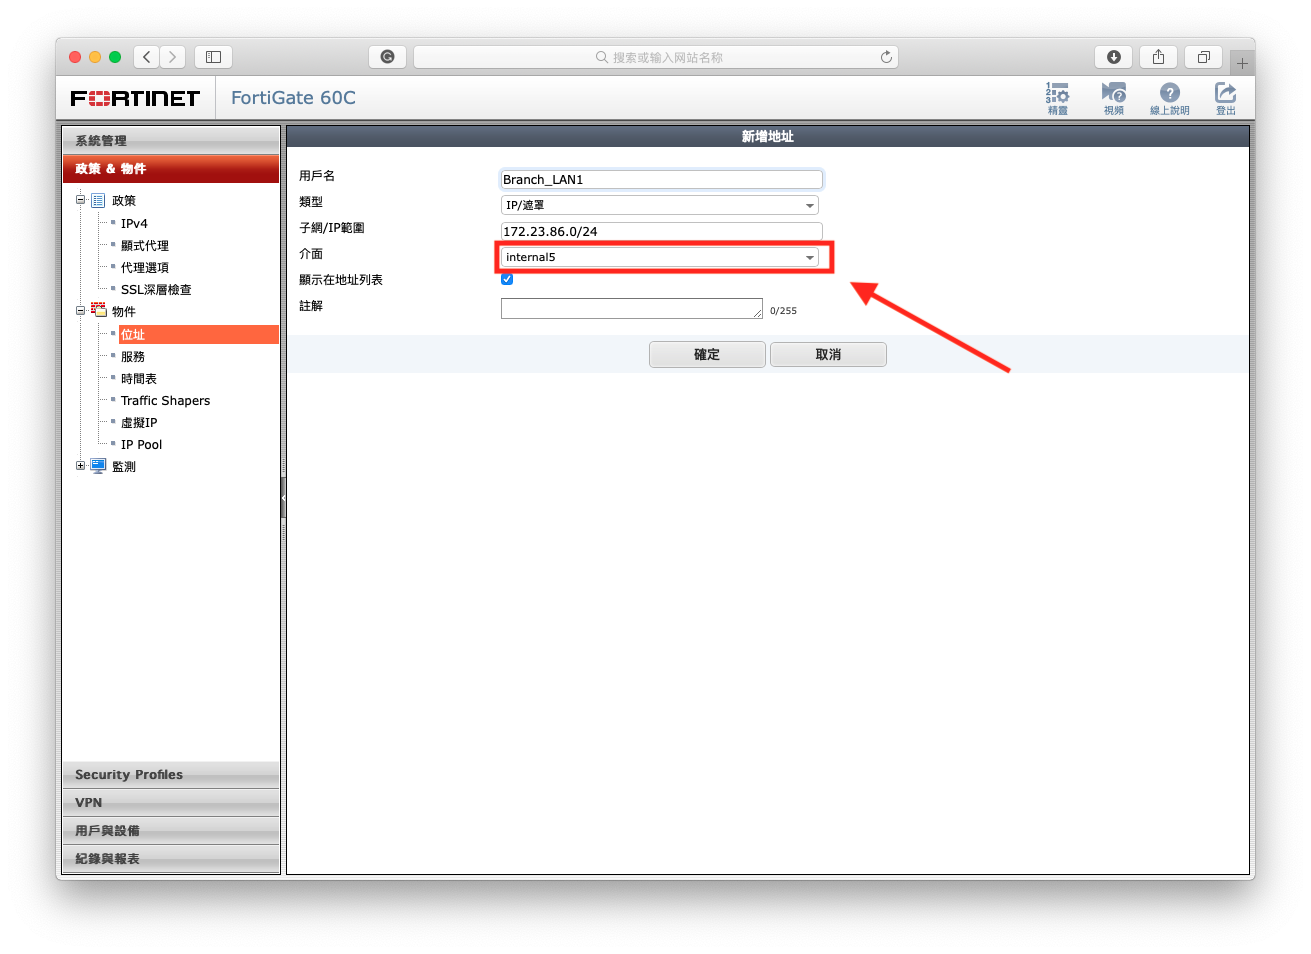
1-2 Setup address object
Go to Policy and Object > Address > Add New in Fortigate panel.
- Create a new address of LOCAL SUBNET (You are now on node2, so branch become local interface, select to internal).
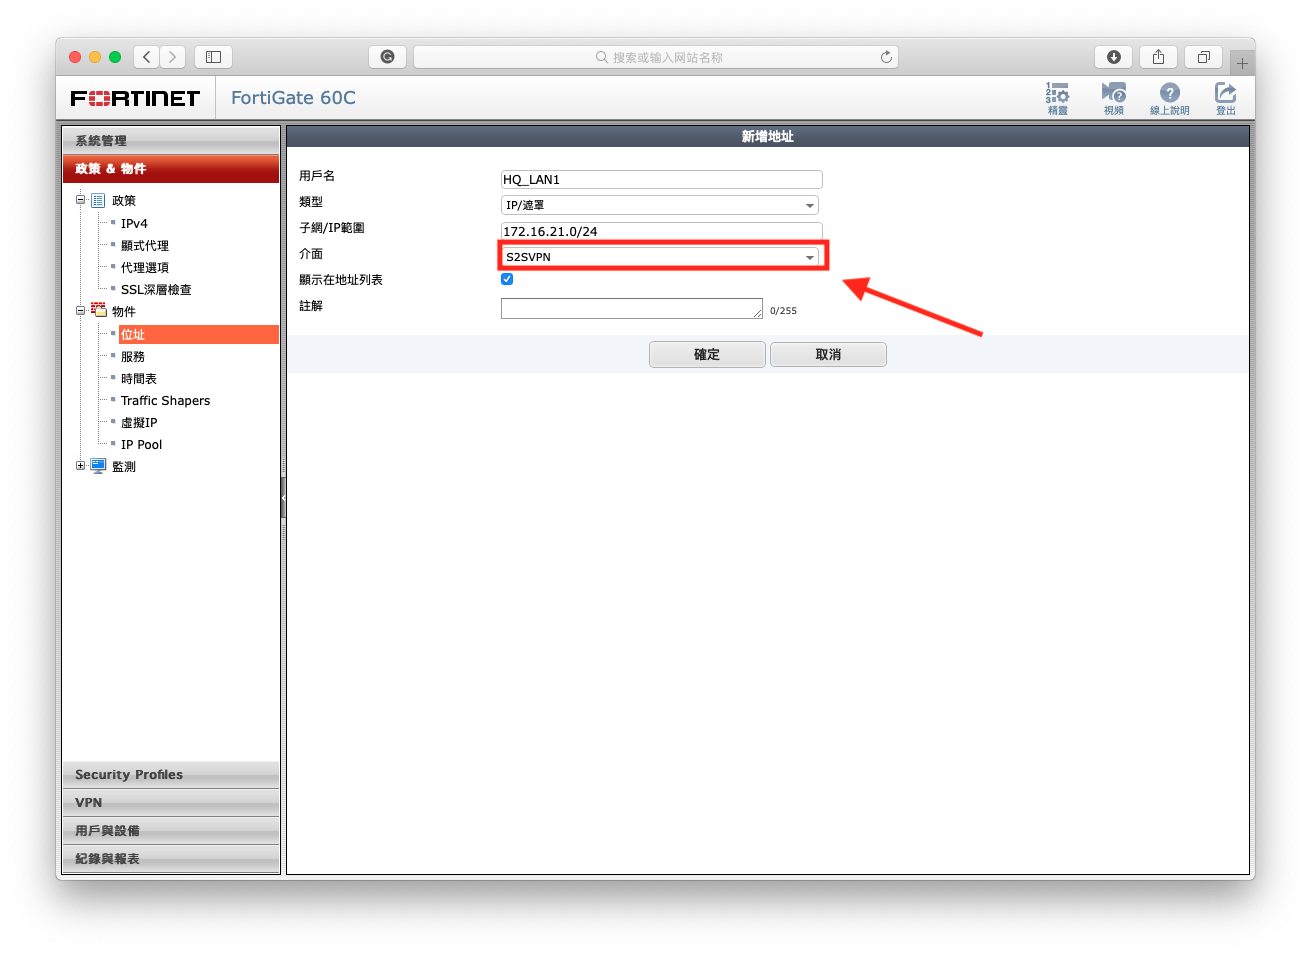
- Create a new address of REMOTE SUBNET(You are now un node2, so HQ become remote interface that connect via S2SVPN, select to S2SVPN).
1-3 Setup policies.
Go to Policy and Object > IPv4 in Fortigate panel.
This policies allow we to access Node1 and allow Node 1 to access Node 2.
Don’t forgot we are now in node2. Branch subnet become local and HQ subnet need to be access via S2SVPN
- From S2SVPN “HQ_LAN1” to Internal “Branch_LAN1”: remote to access Node1.(without NAT)
From Internal “Branch_LAN1” to S2SVPN “HQ_LAN1” : local to access Node2.(without NAT)


1-4 Setup routes.
Go to System Administration > Internet > Route in Fortigate panel.
- Set a route of 172.16.21.0/24 to interface S2SVPN. This help traffic of node1 to be send to node1.

Connect S2S VPN and Ping
To bring up site to site VPN, Go to VPN > Monitor, right click the tunnel you create and bring “up”. If it connect successful, you can see there is an up and green arrow. Now we can try to find if traffic had been send correctly.
When you sent packages by using ping function from 172.23.86.1 to 172.16.21.1.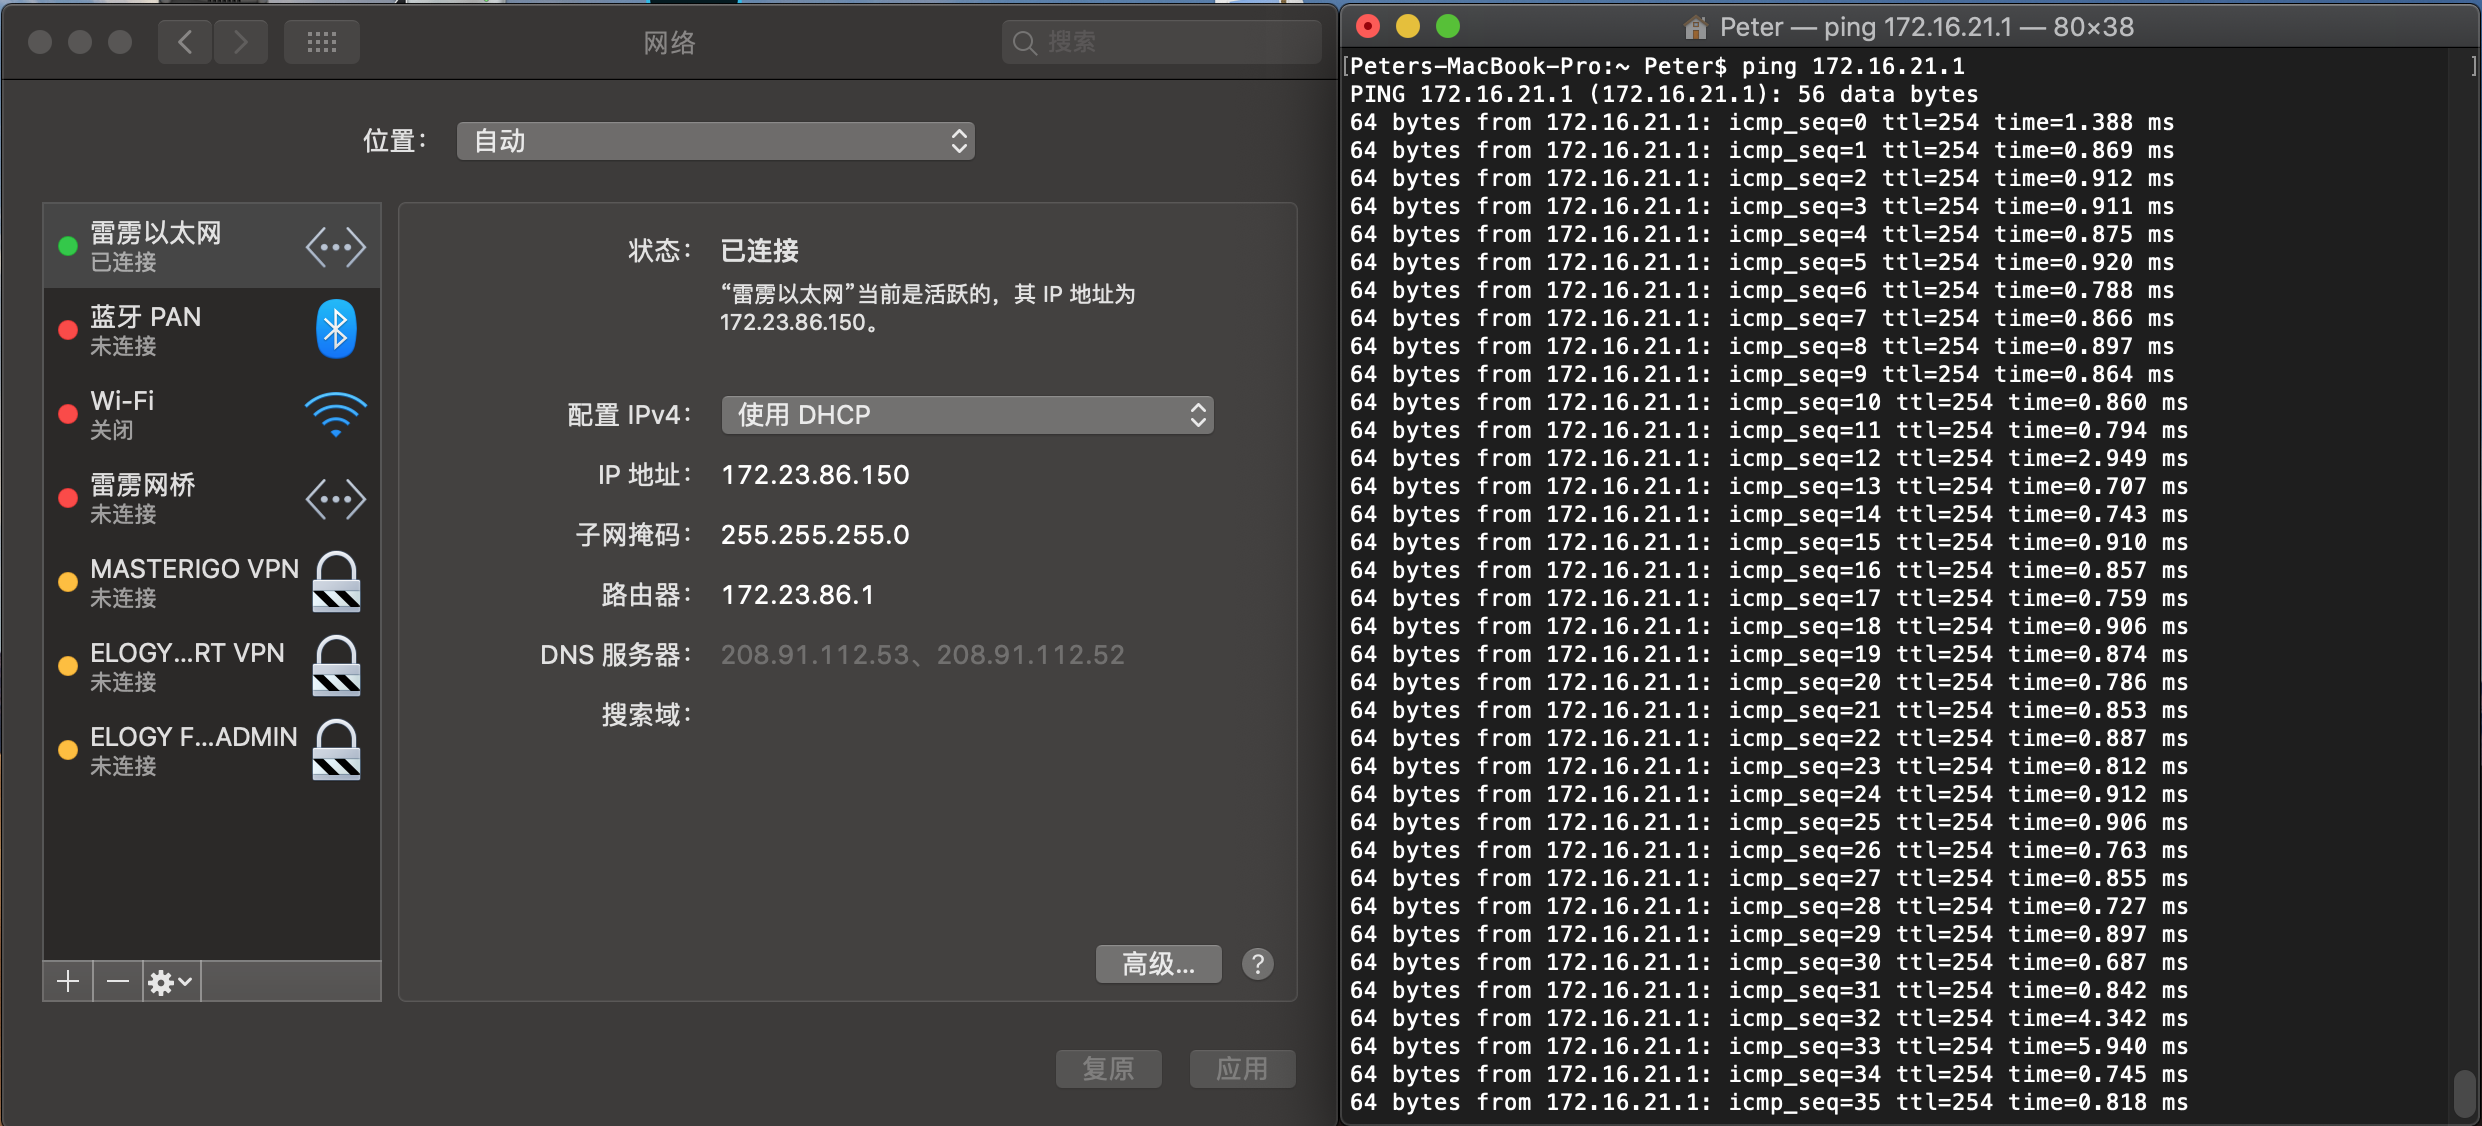 That means no error in node2, also you can try to sent packages form 172.16.21.1 to 172.23.86.1 to try is it correct in node1.
Reference:
Site-to-site IPsec VPN with overlapping subnets
https://cookbook.fortinet.com/site-to-site-ipsec-vpn-with-overlapping-subnets-60/
Site-to-Site IPsec VPN using Wizard in FortiOS 5.2
https://video.fortinet.com/products/fortigate/5.2/site-to-site-ipsec-vpn-using-wizard-in-fortios-5-2
Site-to-Site IPSec VPN Setup with Dynamic Interface
https://video.fortinet.com/latest/site-to-site-ipsec-vpn-setup-with-dynamic-interface
1 則留言